
The Kitchen Work Triangle and How to Design for Pacific Northwest Homes
Kitchen Design in Portland, Vancouver, Camas, Lake Oswego, and Beyond
From the Craftsman kitchens of Portland to the bright, open spaces of Camas and Lake Oswego, Pacific Northwest homes come in every size and style imaginable. Yet, one principle continues to define efficient kitchen design: the kitchen work triangle.
At Amplified Renovations, we help homeowners create kitchens that not only look incredible but also flow beautifully, where every movement between the sink, stove, and refrigerator feels natural. Whether you’re remodeling a small bungalow or planning a luxury open-concept layout, understanding this foundational design concept can make all the difference. This blog will cover the concept of the kitchen work triangle and how to modernize it to help optimize your kitchen remodel.
What Is the Kitchen Work Triangle?
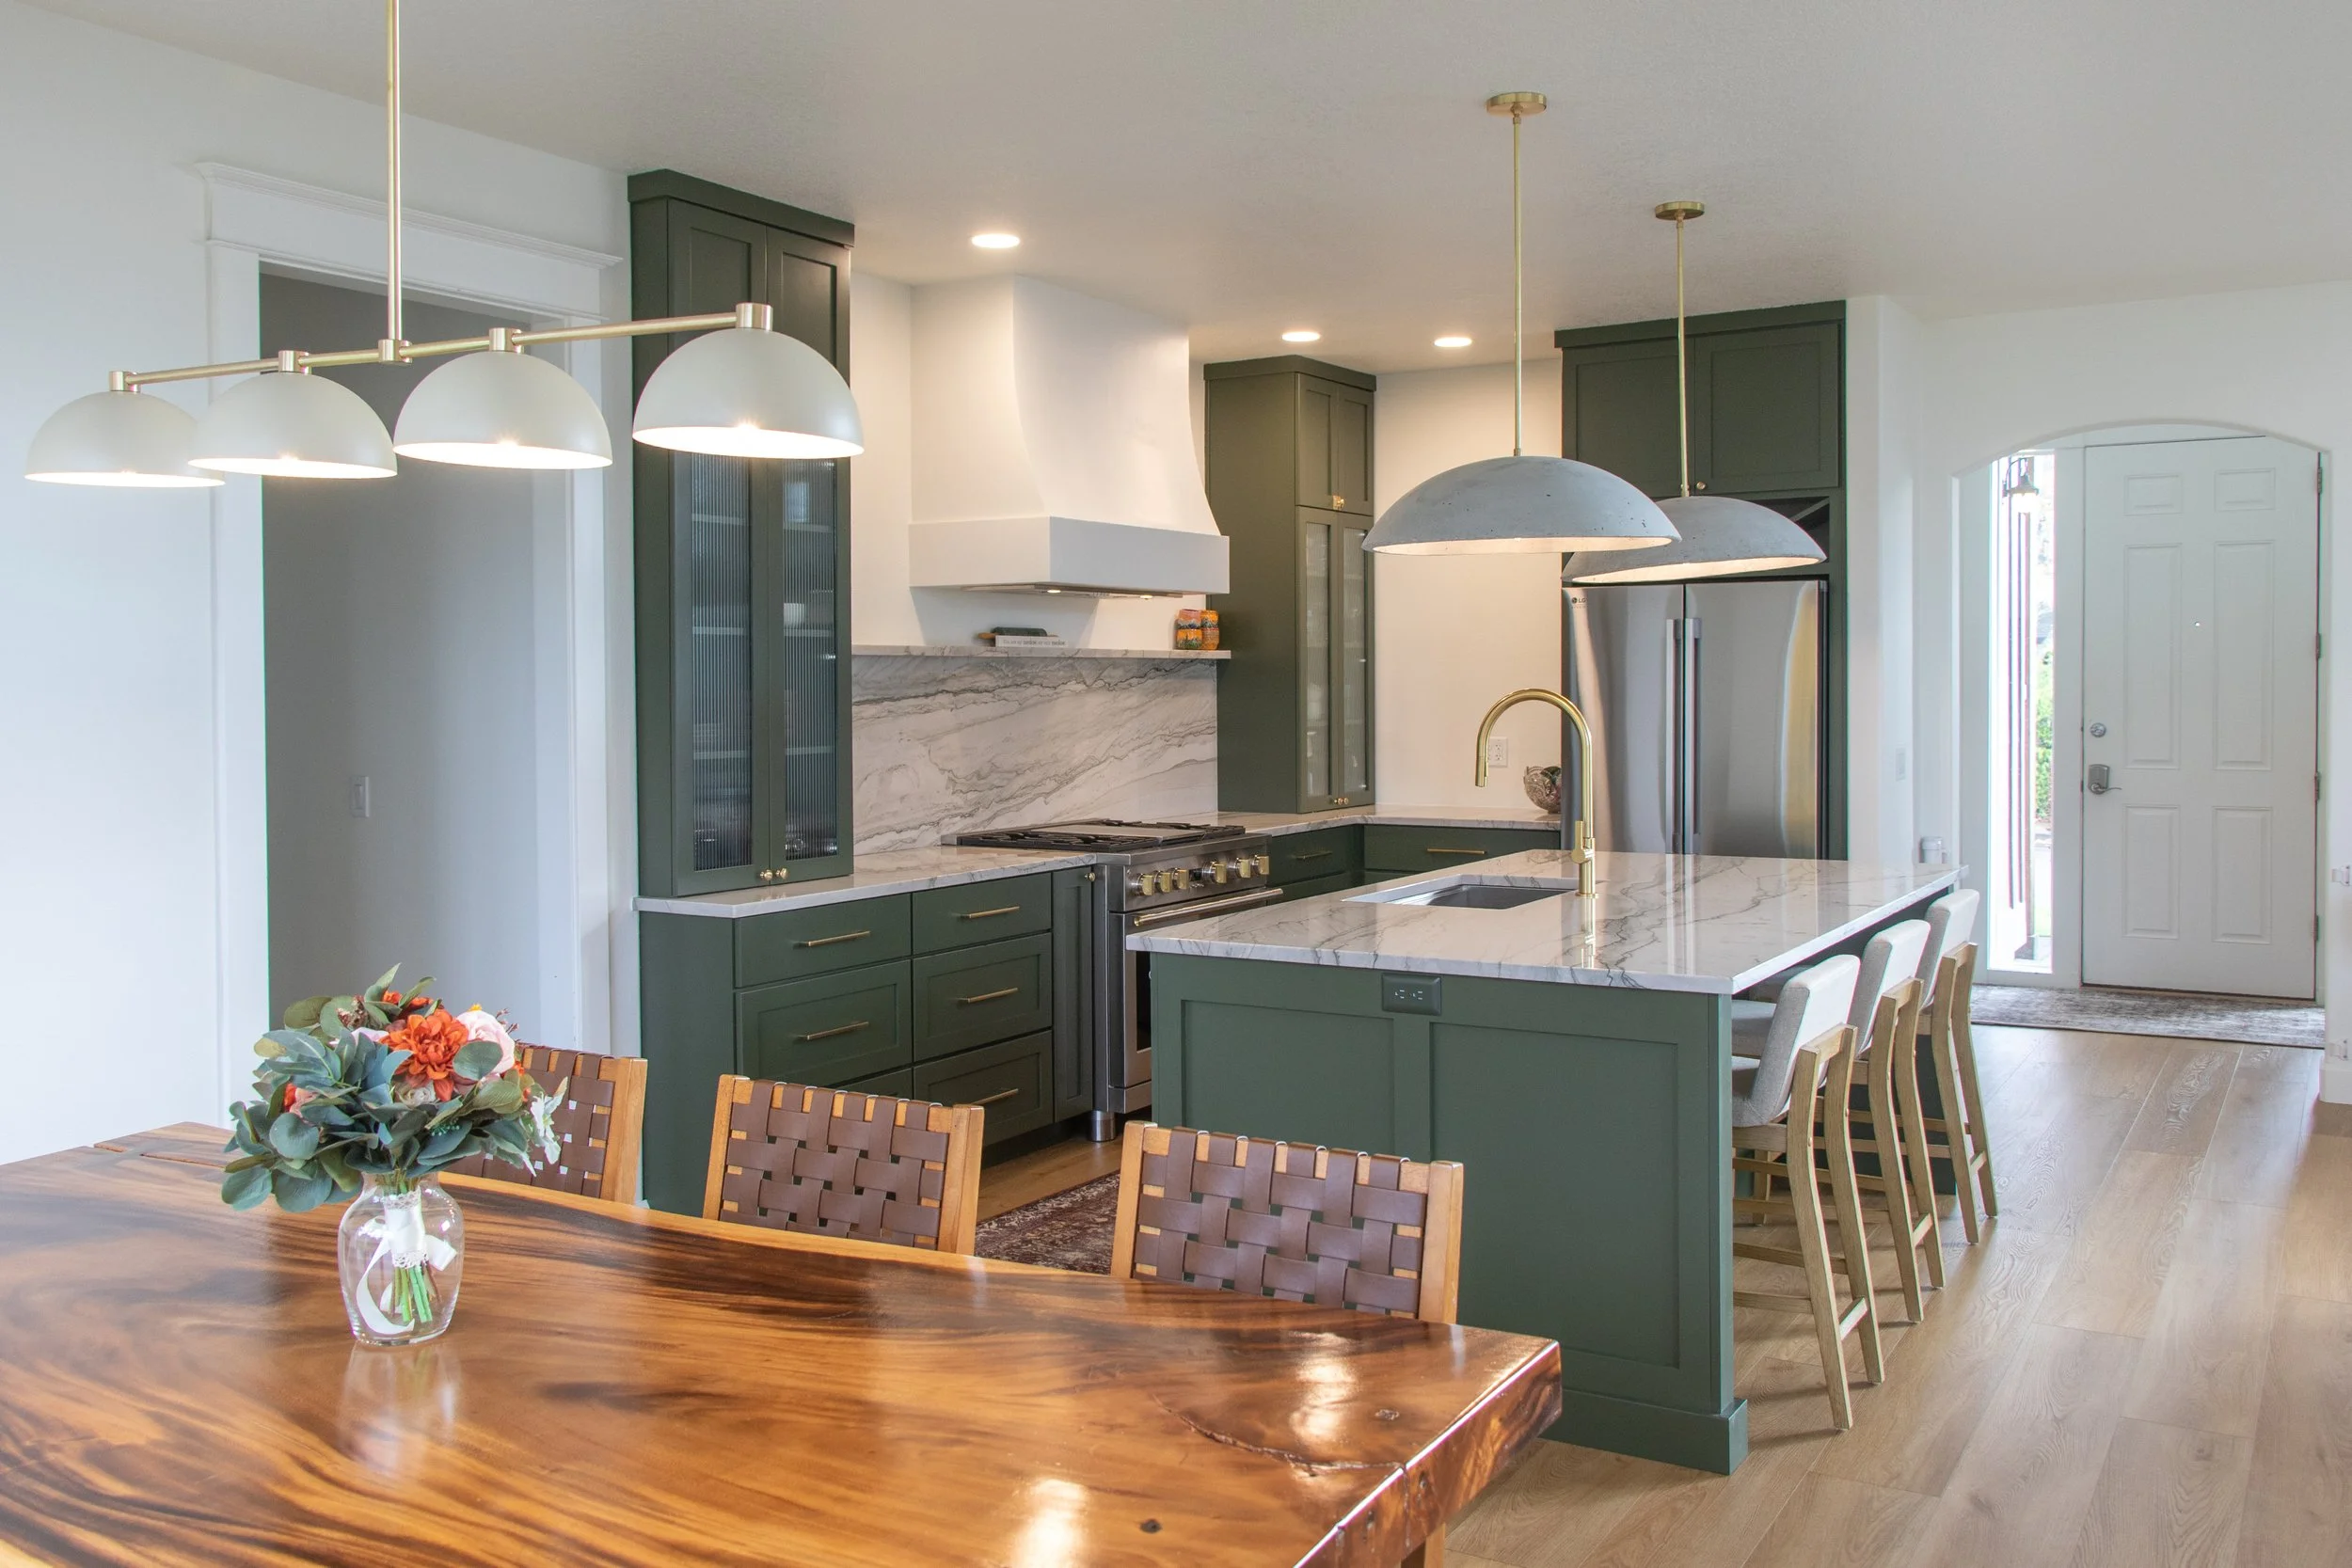
The kitchen work triangle is a time-tested design principle that defines the most efficient relationship between the sink, stove, and refrigerator, the three most-used points in any kitchen, therefore creating a triangle in the kitchen. Although this concept is 80+ years old, the core design theory of thinking about the placement of your most frequently used kitchen appliances and how that placement will impact kitchen flow remains very pertinent.
A Brief History of Kitchen Triangle Design
The concept originated in the 1940s through research conducted at the University of Illinois School of Architecture. Early kitchen designers sought to optimize cooking flow for homeowners by minimizing wasted steps between major work areas. The result was the “work triangle,” which became a foundation for modern kitchen ergonomics.
The Basic Kitchen Triangle Rules
According to NKBA (National Kitchen and Bath Association) guidelines:
Each leg of the triangle should be between 4 and 9 feet.
The total perimeter of the triangle should measure between 13 and 26 feet.
No major traffic paths or obstacles (like islands or cabinetry) should intersect the triangle.
This balance ensures efficient movement, close enough to reduce fatigue, yet spacious enough to prevent crowding.
The Kitchen Work Triangle vs. Modern Work Zones
Modern kitchen design has evolved beyond the single-triangle model, especially in larger or shared-use kitchens. Today, designers often use work zones: dedicated areas for prep, cooking, cleanup, and storage.
Rather than replacing the triangle, these zones build upon it. Many open-concept Pacific Northwest kitchens use dual triangles; one for cooking and one for prep or entertaining. This hybrid approach keeps functionality front and center, even as kitchens become social hubs for family life and gatherings.
How the Work Triangle Fits Common PNW Kitchen Layouts
Each Pacific Northwest home comes with its own set of spatial opportunities and quirks. Here’s how to incorporate the work triangle into the most common kitchen layouts we see across Portland, Vancouver, Camas, and Lake Oswego. This section will highlight the traditional kitchen triangle flow for some of the most common kitchen layouts we work with, and then show how to build on that concept to incorporate modern kitchen work zones.
L-Shaped Kitchen Triangle

Overview:
The L-shaped layout is popular in both historic Portland homes and modern Vancouver remodels. It offers flexibility and open sightlines to adjacent living areas.
Sink Placement: Center the sink on the longer run, often beneath a window or open to the living room.
Fridge Placement: At one end of the “L,” near a secondary doorway or pantry wall.
Range Placement: On the shorter leg, creating a natural working rhythm.
Flow Tip: Maintain 4 ft minimum between appliances for clear circulation.
PNW Tip: Works beautifully with open-concept designs — perfect for Northwest homes that prioritize natural light and connection between rooms.
Modern Work Zone Modification Tips
In an L-shaped kitchen, it’s easy to define zones without sacrificing flow:
Prep Zone: Between sink and range, ideally with uninterrupted counter space.
Cooking Zone: Compact on the short leg; add a hood to define it visually.
Cleanup Zone: Sink + dishwasher combo facing outward for easy conversation.
Storage Zone: Use tall cabinetry or corner pull-outs for dry goods and small appliances.
Pro Tip: In open-concept Portland homes, consider adding a prep cart or butcher block island to form a “mini zone” without breaking the triangle.
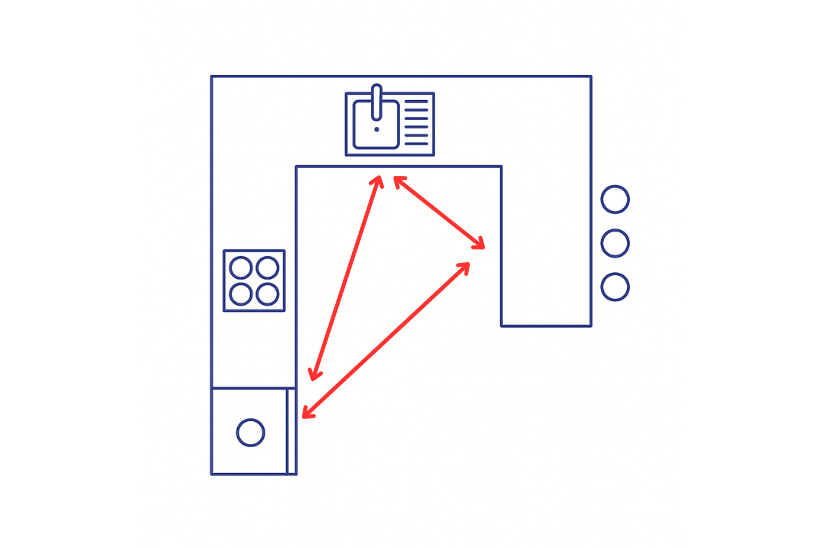
U-Shaped Kitchen Work Triangle

Overview:
Found in many mid-century Portland and Salem homes, the U-shape is one of the most efficient configurations for serious home cooks.
Sink Placement: Centered along the base of the “U,” typically under a window.
Fridge Placement: On one side leg, near the entry point for easy grocery unloading.
Range Placement: On the opposite leg, opposite the sink, for a direct workflow.
Flow Tip: Maintain 42–48 inches of space between opposing counters.
PNW Tip: U-shaped kitchens are perfect for homes that see heavy use in the colder months, providing an enclosed, cozy workspace while keeping everything within easy reach.
Modern Work Zone Modification Tips
The U-shape naturally lends itself to clear zone separation:
Prep Zone: Directly adjacent to the sink, usually in the center section.
Cooking Zone: On one side of the “U,” separate from the fridge for better heat control.
Cleanup Zone: Sink and dishwasher opposite or beside each other.
Storage Zone: Utilize both ends of the “U” for pantry pull-outs and utensil drawers.
Pro Tip: A raised bar or short peninsula extension can define storage or serving zones in large U-shaped layouts.
Peninsula Kitchen Work Triangle
Overview:
A go-to option in smaller Vancouver or Camas homes where space is limited but sociability is key.
Sink Placement: On the peninsula, facing outward for conversation with family or guests.
Fridge Placement: On the back wall, ensuring the door swing doesn’t block the peninsula walkway.
Range Placement: Typically along the main wall; maintain a clear 4–5 ft path between all stations.
Flow Tip: Utilize the peninsula corner for seating without disrupting the triangle’s path.
PNW Tip: Perfect for semi-open remodels that blend older layouts with modern entertaining spaces.
Modern Work Zone Modification Tips
Peninsulas work best when each side serves a distinct purpose:
Prep Zone: Peninsula countertop space between sink and cooktop.
Cooking Zone: Main wall with range and oven; ensure ventilation is clear.
Cleanup Zone: Sink and dishwasher on the peninsula to free up the back wall.
Storage Zone: Overhead cabinets and end-caps on the peninsula for essentials.
Pro Tip: Add under-counter drawers or an appliance garage on the peninsula end for compact storage, perfect for smaller Vancouver or Camas kitchens.
Kitchen Triangle With Island
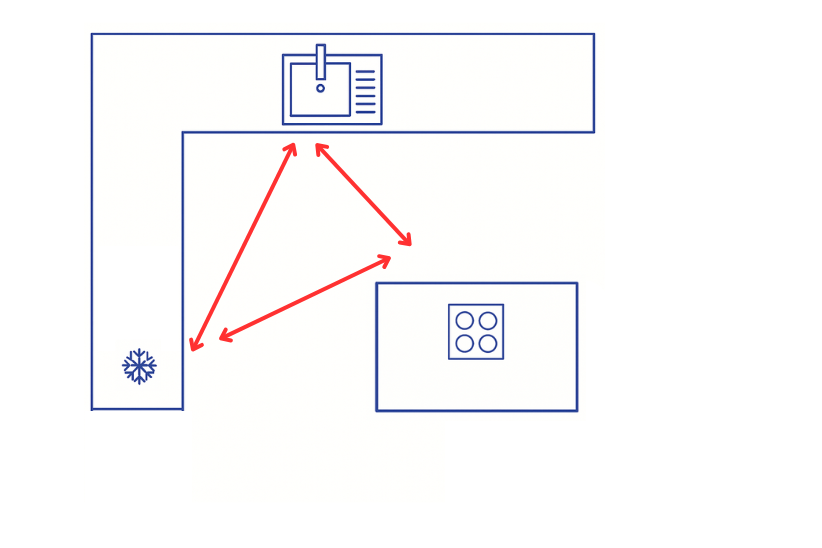
Overview:
Islands are a centerpiece of most new builds and large-scale remodels in Camas, Ridgefield, and Lake Oswego. They can enhance or disrupt the triangle depending on how they’re placed; so thoughtful planning is key.
Sink Placement: Often centered on the island to create a natural prep and cleanup zone.
Fridge Placement: On a nearby perimeter wall, close to food prep surfaces.
Range Placement: Either opposite the island sink or integrated into the island itself.
Flow Tip: Maintain at least 42–48 inches of clearance on all sides of the island.
PNW Tip: Many homeowners in the Pacific Northwest use dual-purpose islands with prep sinks, seating, or under-counter storage, creating both function and a focal point for gatherings.
How to Incorporate the Work Triangle With an Island
When adding an island to an existing kitchen, ensure each leg of the triangle stays under 9 ft and that the island doesn’t obstruct key pathways. In larger kitchens, a secondary triangle (for prep or entertaining) keeps multiple cooks working comfortably together.
Modern Work Zone Modification Tips
Islands are perfect for zoning, especially in larger or open-concept homes:
Prep Zone: On or beside the island sink for ample counter workspace.
Cooking Zone: On a parallel wall or built into the island for dual use.
Cleanup Zone: Centered at the island sink; integrate a pull-out trash bin.
Storage Zone: Use island cabinetry for cookware and perimeter walls for pantry storage.
Pro Tip: Many Camas and Lake Oswego homeowners are now adding secondary prep sinks on islands, creating a true two-cook “dual zone” setup.
Small or Galley Kitchen Work Triangle

Overview:
Common in older Portland and downtown Vancouver homes, galley kitchens are compact but can be surprisingly efficient when designed around the triangle concept.
Sink Placement: Centered on one side for balanced movement.
Fridge Placement: At one end, closest to the entryway.
Range Placement: On the opposite wall, offset slightly for safe clearance.
Flow Tip: Use counter-depth appliances and open shelving to increase visual space.
PNW Tip: Skylights, reflective surfaces, and light cabinetry colors can make these narrower kitchens feel open and inviting even on cloudy winter days.
Modern Work Zone Modification Tips
Even tight galley kitchens can benefit from smart zoning:
Prep Zone: Between sink and range; prioritize uninterrupted counter space.
Cooking Zone: Group the range and oven together for compact efficiency.
Cleanup Zone: Sink and dishwasher side-by-side near the entry end.
Storage Zone: Vertical shelving or pull-out pantries maximize every inch.
Pro Tip: A small rolling island or drop-leaf cart can create an efficient and flexible food preparation zone when space is limited.
Tips for Applying the Triangle in Pacific Northwest Homes
Respect existing plumbing and electrical. Many older Portland and Vancouver homes have small kitchens and kitchen space limitations that can influence placement.
Plan around natural light. Windows often dictate where your sink within the kitchen sink triangle belongs.
Account for traffic flow. Ensure walkways between the kitchen and dining areas remain clear.
Blend form and function. The sides of the triangle should support cooking and cleaning efficiency while maintaining visual harmony.
Sustainability matters. Use energy-efficient appliances and recycled materials to live more sustainably in the Northwest.
FAQs About the Kitchen Work Triangle
What are the NKBA guidelines for the kitchen work triangle?
Each leg should measure between 4 and 9 feet, with a total distance of 13 to 26 feet and no major obstacles blocking the paths.
Do modern kitchens still use the work triangle?
Yes, though many newer designs use multiple overlapping triangles or “work zones” to accommodate open concepts and multiple cooks.
What if my kitchen is too small for a perfect triangle?
Adapt the shape. In galley or L-shaped kitchens, aim for efficient proximity instead of equal spacing.
Can I have two triangles in one kitchen?
Absolutely. Dual triangles work well in kitchens with prep sinks or large islands.
How does the triangle apply to Portland-area homes?
Historic homes often have narrower footprints and unique cabinetry lines. A skilled remodeler like Amplified Renovations can reconfigure walls, utilities, and cabinetry to preserve efficiency and modernize flow.